Monday, March 26, 2012

Homemade Cinnamon Rolls


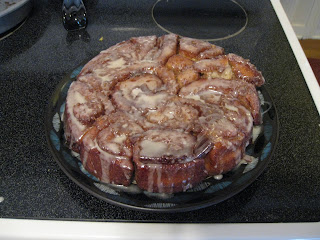
Sorry for the lack of crafts on here. I've been baking and cooking a lot lately, but I will do some more crafts soon! A few weekends ago I was feeling very energetic and made homemade cinnamon rolls! They were very tasty, rich and sweet. I followed one recipe I found online here but had to modify it because I didn't have any buttermilk, so I mixed some lemon juice with regular milk and let it sit for a few minutes. I also used the Pioneer Woman's glaze recipe (except I didn't use an entire bag of powdered sugar, because there are only 2 of us!). The only substitution I had to do was the maple flavoring, because I didn't have any. Maple syrup works just fine! Now, I'll warn you, these cinnamon rolls are extremely addicting and definitely not even close to healthy. But they freeze really well, so freeze them and don't eat too many at once! :) Here is my modified recipe based off the two recipes above:

Homemade (Delicious!) Cinnamon Rolls
Dough
2 1/2 cups all-purpose flour
2 tablespoons sugar
1 1/4 teaspoons baking powder
1/2 teaspoon baking soda
1/2 teaspoon salt
1 1/4 cup buttermilk (or milk with a little more than 1 tablespoon lemon juice)

Cinnamon-Sugar Filling
3/4 cup brown sugar, packed
1/4 cup sugar
2 teaspoons ground cinnamon
1/8 teaspoon ground cloves
1/8 teaspoon salt


Glaze
Little more than 1/4 bag powdered sugar
1/2 teaspoon maple syrup
1/4 cup milk
1/4 cup melted butter
Splash of brewed coffee
Dash of salt

1. Place oven rack in upper part of oven. Preheat to 425.

2. Grease 9-inch round cake pan (I use Crisco).

3. Combine Cinnamon-Sugar filling in small bowl. Add 1 tablespoon melted butter and mix with fingers until crumbly.

4. Whisk flour, sugar, baking powder, baking soda, and salt in large bowl. Whisk buttermilk and 2 tablespoons melted butter in small bowl. Add liquid to flour mixture- stir with wooden spoon until just combined.

5. Transfer dough to floured surface and knead until just smooth, about 5 minutes.

6. Roll dough into about a 12x9 inch rectangle. Brush dough with 2 tablespoons melted butter. Sprinkle evenly with filling, leaving about 1/2-inch border of plain dough around edges. (I didn't do this and it was a mess! The cinnamon-sugar mixture makes a ton, so you might not even need all of it; I had a really hard time rolling it into a tight roll.)


7. Press filling firmly into dough. Starting at long side, roll dough, pressing lightly to form a tight log. Pinch seam to seal.


8. Place log seam-side down and cut evenly into about 8 pieces. (I cut more than that though; it is also easier to cut the dough if you refrigerate it for a bit).

9. Turn pieces onto sides and place in greased pan. Put the first roll into the center of the pan and make a spiral with the remaining rolls. Brush with 2 tablespoons melted butter.


10. Bake until edges are golden brown, about 25-28 minutes. Cool about 5 minutes in pan.

11. While buns are baking, make glaze! Whisk all ingredients together in large bowl until very smooth. Glaze should be thick but pourable. If too thin, add more powdered sugar. If too thick, add milk.


12. When buns are done and cooled a bit, pour glaze over them. Oh yum! (I flipped the buns out of the pan first because I wanted the glaze to drip down the sides of the buns.) Mmmmmmm!!!



Follow Me on Pinterest

Tuesday, March 20, 2012

Oat-Date Bars


It's a lot easier to buy granola bars at the grocery store, but lately I've been trying not to buy something that I could make. I tried this recipe from the Whole Foods website. They've got a ton of very healthy and very delicious recipes! I wish there was a Whole Foods store where I live. I visited one for the first time when I visited Nashville, TN and it was awesome! Anyway,
so here is the incredibly easy recipe for the Oat-Date bars. They are really tasty, but dry out after about a week. But since they're so easy to make, you could totally make these every week if you wanted! Also, don't eat too many of them at once, because they do have, er, dates in them (I am not speaking from experience *cough).

Oat-Date Bars:
2/3 cup chopped, pitted dates, divided
1/2 cup water
1 large egg
1 1/4 cups quick-cooking oats
1/2 cup whole-wheat flour
1/2 teaspoon cinnamon
1/4 teaspoon plus 1/8 teaspoon baking powder
1/8 teaspoon salt

Preheat oven to 375 and grease an 8X8 pan (or whatever you have on hand- I used a larger one and it made more thinner bars). In a blender combine 1/3 cup dates and water, blend until very smooth. Add egg until just combined. In a medium bowl, combine oats, flour, cinnamon, baking powder and salt and whisk until combined. Add date-water mixture and remaining 1/3 cup of dates; stir until moistened.

Scrape into prepared pan, level the top with a spatula. Bake until firm and lightly brown around edges- about 17 minutes. Cool in pan and cut into bars. Enjoy!

Follow Me on Pinterest

Monday, March 12, 2012

Easy Vegetable Stock


Today I finally made some vegetable stock. I've been meaning to make some for about a week. If you've got a few vegetables you need to use up, you should make vegetable stock! It's pretty easy, and if you're going to be home for about two hours, then you're set!
For my veggie stock, I put in:
-One sliced onion
-A handful of baby carrots (I didn't have any big ones), cut up
-A tomato, sliced
-About 4 stocks of celery, washed and cut

I put a spoonful of garlic into a large pot on the stove and cooked it over medium-high heat for just a minute. Then I added my veggies, some salt and pepper, crushed bay leaves, parsley, a smidgen of garlic powder and a tad bit of tarragon. I let the onions cook just a bit before I added about 10-11 cups of water. Bring the water to a boil, then reduce to a simmer for 2 hours.


My stock ended up not being as flavorful as other stocks I've made before, but I think it's because I needed to have more veggies for the amount of water I used (or just let it simmer longer).


By the time it was all said and done, I had a little more than 8 cups of yummy veggie stock that I can use to make soups and dinners with! I froze most of it because I don't use it all at one time. And it made the house smell oh so good!


Follow Me on Pinterest

Saturday, March 10, 2012

Homemade Bread!

I have really wanted to make homemade bread for out little family, and so I've been on the lookout for a good recipe. My Mom let me borrow some bread making books, which I haven't tried yet. But I did try a recipe from one of my favorite blogs, Homemade Ginger. Her recipe is so delicious! After the first loaf came out of the oven, I thought, "It actually LOOKS like real sandwich bread!" I will definitely be making it again. When I made this bread, I left out the wheat gluten and dough enhancer (because I didn't have any) and it turned out great. I also intend to try more bread recipes. My Mom gave me two great books, but they do look a bit intimidating!


Here is the bread recipe from Homemade Ginger:
2 1/2 cups warm water
1 1/2 T. yeast
2 cups white whole wheat flour

Combine these in your mixer and let it sponge for 15 minutes.

Cover mixture with 1 cup flour* to protect it from the oil and honey. Add the remaining ingredients slowly.

1/3 cup oil
1/3 cup honey
2 1/2 teasp salt
3-4 cups whole wheat flour* (this does not include the flour you added earlier)

Add flour to mixer slowly until it begins to pull away from the sides of the bowl. Dough should be smooth and elastic, so don't add too much flour.

Knead 6-10 minutes on Speed 1.

Form the dough into 2 loaves and place in greased loaf pans. Allow to rise until double in size (about 30-60 minutes). Bake for 25-30 minutes at 350. Allow to cool 10 minutes in pan before placing on cooling rack.

Yum!

Sunday, March 4, 2012

I Love Baking Soda!

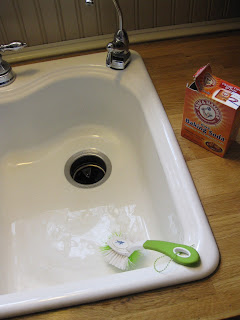
Hey there! So I've been on a kick making my own cleaners, etc. A few days ago I had to clean the kitchen sink. You know how coffee stains a white sink? Yeah. I was thinking, "Man. I'm gonna have to use the powdered bleach on this." And then I thought I should try baking soda first, just to see if it worked. And... ohmygosh. It worked just as well as powdered bleach! There is a bit more scrubbing involved, but a little elbow grease never hurt anybody! So, here's my sink after I cleaned it:

Can you believe how sparkly it is?!


I'm pretty proud of my baking soda! (I'm such a nerd, I know!) 

Another use for baking soda is to wash your hair! At first I thought it was insane, but after reading this great blog (Simple Mom), I thought I'd give it a try. You basically just mix baking soda and water together and squirt it on your hair in the shower. She also uses apple cider vinegar for conditioner, but it didn't work for me. I do love the baking soda "shampoo" though! Until I find another natural type conditioner, I'm going to stick with what I already have and use it up. I haven't washed my hair with shampoo in about a week and my hair is way less grimy than it normally is! Don't worry, I wash it every other day with the baking soda! The idea behind cleaning your hair with baking soda is that it doesn't strip your scalp of the natural oils like regular shampoo does. It literally just cleans your hair. It was weird when I first tried it, because my hair felt "squeaky clean"- literally. When I got out of the shower I thought I would have a tangled mess, but I ran my brush through and it was so smooth! Shocker! Anyhow, baking soda is way less expensive than shampoo, and I know exactly what is going on my head/skin- no more nasty chemicals. If anyone knows of a great natural conditioner, I am totally open to that!


Here's a picture of my "shampoo" and "conditioner". I won't be using the apple cider vinegar anymore, but I am still loving the baking soda!

Follow Me on Pinterest