
Sunday, September 23, 2012
We've Moved!
I sort of took a hiatus from posting for a few different reasons. In May we moved in with my parents while waiting to see where the Lord wanted us. We had no idea where we would end up finding jobs so we thought it would be the wisest choice. And it was! God made it clear that we would be moving to Nashville, Tennessee! I got a job at Vanderbilt as a nurse. Two days before we moved we found out that Niall got a job at a nearby high school as a math teacher! So in July we were off! We have been getting settled here in Tennessee and it has been anything but easy. It is a fun adventure but it has it's hard times too. Being so far from everything familiar and our family is very challenging. I will post some updates and pictures soon!

Tuesday, May 8, 2012
Happy Birthday Niall!

Well, we celebrated Niall's birthday by moving all of the big things out of the house. What fun. :) I feel so blessed to be married to him, he is such an incredible husband, friend and person. Can't think of a better husband! He is amazingly patient, gentle, and kind to me, even when I am a big brat to him. I'm one spoiled girl to have him all to myself!

Bye-bye couch! We love you!!!
We also did Bloomsday the next day! We ran almost the whole thing (7.4 miles!) and I'm pretty sure I complained almost the whole time. But Niall stuck it out and ran it with me. He's such a good sport. Nice work babe!

There were so many people!!!

Thursday, April 5, 2012
Homemade Powdered Laundry Soap

Homemade Powdered Laundry Soap
1 cup Borax
1 cup Arm & Hammer Washing Soda
3/4 bar Fels Naptha Bar Soap, grated
Mix all these together and voila! Use 3 Tablespoons of powdered soap for a large load of laundry. It looks a little funny with the grated soap, but it smells so clean!


All three of these items are found in the laundry isle at the store. Do NOT buy Baking Soda, you want the Washing Soda. You can also use Dr. Bronner's bar soap. I would have done this, but it is a bit more expensive and they didn't have any at the store I went to. Also, the Fels Naptha soap looks like cheese when you grate it, so don't eat it! Haha.
Here is a price breakdown:
Fels Naptha Bar Soap: $0.97
Washing Soda: $3.17
Borax: $3.38
Total: $7.52
And I still have a TON of Borax and Washing Soda left over. This stuff will last me a long time! I figure this will last at least 4 times as long as the $7 bottle of Tide I usually buy! And more natural! I've been washing clothes with it all day today and they come out very fresh and clean!
I'M A NURSE!!!!!!!!
I found out yesterday that I passed my NCLEX test, so now I'm a nurse!!!!!!! Now to get a job! :)
Monday, March 26, 2012
Homemade Cinnamon Rolls

Sorry for the lack of crafts on here. I've been baking and cooking a lot lately, but I will do some more crafts soon! A few weekends ago I was feeling very energetic and made homemade cinnamon rolls! They were very tasty, rich and sweet. I followed one recipe I found online here but had to modify it because I didn't have any buttermilk, so I mixed some lemon juice with regular milk and let it sit for a few minutes. I also used the Pioneer Woman's glaze recipe (except I didn't use an entire bag of powdered sugar, because there are only 2 of us!). The only substitution I had to do was the maple flavoring, because I didn't have any. Maple syrup works just fine! Now, I'll warn you, these cinnamon rolls are extremely addicting and definitely not even close to healthy. But they freeze really well, so freeze them and don't eat too many at once! :) Here is my modified recipe based off the two recipes above:
Homemade (Delicious!) Cinnamon Rolls
Dough
2 1/2 cups all-purpose flour
2 tablespoons sugar
1 1/4 teaspoons baking powder
1/2 teaspoon baking soda
1/2 teaspoon salt
1 1/4 cup buttermilk (or milk with a little more than 1 tablespoon lemon juice)
Cinnamon-Sugar Filling
3/4 cup brown sugar, packed
1/4 cup sugar
2 teaspoons ground cinnamon
1/8 teaspoon ground cloves
1/8 teaspoon salt
Glaze
Little more than 1/4 bag powdered sugar
1/2 teaspoon maple syrup
1/4 cup milk
1/4 cup melted butter
Splash of brewed coffee
Dash of salt
1. Place oven rack in upper part of oven. Preheat to 425.
2. Grease 9-inch round cake pan (I use Crisco).
3. Combine Cinnamon-Sugar filling in small bowl. Add 1 tablespoon melted butter and mix with fingers until crumbly.
4. Whisk flour, sugar, baking powder, baking soda, and salt in large bowl. Whisk buttermilk and 2 tablespoons melted butter in small bowl. Add liquid to flour mixture- stir with wooden spoon until just combined.
5. Transfer dough to floured surface and knead until just smooth, about 5 minutes.
6. Roll dough into about a 12x9 inch rectangle. Brush dough with 2 tablespoons melted butter. Sprinkle evenly with filling, leaving about 1/2-inch border of plain dough around edges. (I didn't do this and it was a mess! The cinnamon-sugar mixture makes a ton, so you might not even need all of it; I had a really hard time rolling it into a tight roll.)

7. Press filling firmly into dough. Starting at long side, roll dough, pressing lightly to form a tight log. Pinch seam to seal.

8. Place log seam-side down and cut evenly into about 8 pieces. (I cut more than that though; it is also easier to cut the dough if you refrigerate it for a bit).
9. Turn pieces onto sides and place in greased pan. Put the first roll into the center of the pan and make a spiral with the remaining rolls. Brush with 2 tablespoons melted butter.

10. Bake until edges are golden brown, about 25-28 minutes. Cool about 5 minutes in pan.
11. While buns are baking, make glaze! Whisk all ingredients together in large bowl until very smooth. Glaze should be thick but pourable. If too thin, add more powdered sugar. If too thick, add milk.

12. When buns are done and cooled a bit, pour glaze over them. Oh yum! (I flipped the buns out of the pan first because I wanted the glaze to drip down the sides of the buns.) Mmmmmmm!!!


Tuesday, March 20, 2012
Oat-Date Bars

It's a lot easier to buy granola bars at the grocery store, but lately I've been trying not to buy something that I could make. I tried this recipe from the Whole Foods website. They've got a ton of very healthy and very delicious recipes! I wish there was a Whole Foods store where I live. I visited one for the first time when I visited Nashville, TN and it was awesome! Anyway,
so here is the incredibly easy recipe for the Oat-Date bars. They are really tasty, but dry out after about a week. But since they're so easy to make, you could totally make these every week if you wanted! Also, don't eat too many of them at once, because they do have, er, dates in them (I am not speaking from experience *cough).
Oat-Date Bars:
2/3 cup chopped, pitted dates, divided
1/2 cup water
1 large egg
1 1/4 cups quick-cooking oats
1/2 cup whole-wheat flour
1/2 teaspoon cinnamon
1/4 teaspoon plus 1/8 teaspoon baking powder
1/8 teaspoon salt
Preheat oven to 375 and grease an 8X8 pan (or whatever you have on hand- I used a larger one and it made more thinner bars). In a blender combine 1/3 cup dates and water, blend until very smooth. Add egg until just combined. In a medium bowl, combine oats, flour, cinnamon, baking powder and salt and whisk until combined. Add date-water mixture and remaining 1/3 cup of dates; stir until moistened.
Scrape into prepared pan, level the top with a spatula. Bake until firm and lightly brown around edges- about 17 minutes. Cool in pan and cut into bars. Enjoy!

Monday, March 12, 2012
Easy Vegetable Stock

For my veggie stock, I put in:
-One sliced onion
-A handful of baby carrots (I didn't have any big ones), cut up
-A tomato, sliced
-About 4 stocks of celery, washed and cut
I put a spoonful of garlic into a large pot on the stove and cooked it over medium-high heat for just a minute. Then I added my veggies, some salt and pepper, crushed bay leaves, parsley, a smidgen of garlic powder and a tad bit of tarragon. I let the onions cook just a bit before I added about 10-11 cups of water. Bring the water to a boil, then reduce to a simmer for 2 hours.


By the time it was all said and done, I had a little more than 8 cups of yummy veggie stock that I can use to make soups and dinners with! I froze most of it because I don't use it all at one time. And it made the house smell oh so good!

Saturday, March 10, 2012
Homemade Bread!
I have really wanted to make homemade bread for out little family, and so I've been on the lookout for a good recipe. My Mom let me borrow some bread making books, which I haven't tried yet. But I did try a recipe from one of my favorite blogs, Homemade Ginger. Her recipe is so delicious! After the first loaf came out of the oven, I thought, "It actually LOOKS like real sandwich bread!" I will definitely be making it again. When I made this bread, I left out the wheat gluten and dough enhancer (because I didn't have any) and it turned out great. I also intend to try more bread recipes. My Mom gave me two great books, but they do look a bit intimidating!

Here is the bread recipe from Homemade Ginger:
2 1/2 cups warm water
1 1/2 T. yeast
2 cups white whole wheat flour
Combine these in your mixer and let it sponge for 15 minutes.
Cover mixture with 1 cup flour* to protect it from the oil and honey. Add the remaining ingredients slowly.
1/3 cup oil
1/3 cup honey
2 1/2 teasp salt
3-4 cups whole wheat flour* (this does not include the flour you added earlier)
Add flour to mixer slowly until it begins to pull away from the sides of the bowl. Dough should be smooth and elastic, so don't add too much flour.
Knead 6-10 minutes on Speed 1.
Form the dough into 2 loaves and place in greased loaf pans. Allow to rise until double in size (about 30-60 minutes). Bake for 25-30 minutes at 350. Allow to cool 10 minutes in pan before placing on cooling rack.
Yum!
Sunday, March 4, 2012
I Love Baking Soda!
Hey there! So I've been on a kick making my own cleaners, etc. A few days ago I had to clean the kitchen sink. You know how coffee stains a white sink? Yeah. I was thinking, "Man. I'm gonna have to use the powdered bleach on this." And then I thought I should try baking soda first, just to see if it worked. And... ohmygosh. It worked just as well as powdered bleach! There is a bit more scrubbing involved, but a little elbow grease never hurt anybody! So, here's my sink after I cleaned it:
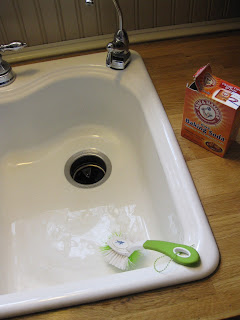


Can you believe how sparkly it is?!

I'm pretty proud of my baking soda! (I'm such a nerd, I know!)
Another use for baking soda is to wash your hair! At first I thought it was insane, but after reading this great blog (Simple Mom), I thought I'd give it a try. You basically just mix baking soda and water together and squirt it on your hair in the shower. She also uses apple cider vinegar for conditioner, but it didn't work for me. I do love the baking soda "shampoo" though! Until I find another natural type conditioner, I'm going to stick with what I already have and use it up. I haven't washed my hair with shampoo in about a week and my hair is way less grimy than it normally is! Don't worry, I wash it every other day with the baking soda! The idea behind cleaning your hair with baking soda is that it doesn't strip your scalp of the natural oils like regular shampoo does. It literally just cleans your hair. It was weird when I first tried it, because my hair felt "squeaky clean"- literally. When I got out of the shower I thought I would have a tangled mess, but I ran my brush through and it was so smooth! Shocker! Anyhow, baking soda is way less expensive than shampoo, and I know exactly what is going on my head/skin- no more nasty chemicals. If anyone knows of a great natural conditioner, I am totally open to that!

Here's a picture of my "shampoo" and "conditioner". I won't be using the apple cider vinegar anymore, but I am still loving the baking soda!
Thursday, February 23, 2012
Going Natural
So for awhile now I've been wanting to "go green" except I didn't really understand what that means. This week I've been doing a lot of searching and learning things I hadn't even thought of before. I started thinking about every lotion or cream or type of make-up I have ever put on my skin, and how almost all of it is probably not good for my skin or environment at all. I've also been doing some scoping about healthier eating. I came across this website about foods with the most amount of pesticides in them. When I saw this I thought, "Huh? Aren't all fresh fruits and vegetables good for you?" Well, no. Many of these pesticides can lead to cancer, which I already have enough of in my family, thank you very much. So, I've decided to try to be a bit healthier. From what I wash my hair with to what I clean my house with to what I eat. I know it will be a very long, gradual change but I do feel the need to do it. The bottom line is, I want to be healthier. And I want to leave a smaller footprint on the earth than I am currently leaving. So there you go. Tonight I bought a few things to start off with:


I've been wanting to try Tom's toothpaste for awhile and I was completely out of mine, so I went ahead and did it. It was only about $1 more than my regular toothpaste and I only have to buy toothpaste about twice a year, so I figured, what the heck? I also bought some hydrogen peroxide, white vinegar, Dr. Bronner's Soap and a spray bottle to make my own household cleaner. I'll post more about how I'm planning to use these products. I'm especially excited about the Dr. Bronner's because I've heard so many good things about it and I got it for a steal of a deal- $10 at Trader Joe's for the big 32-ounce bottle. It was over $17 at both Super-1 Foods and Huckleberries, so I saved at least $7!
How do you do "natural living"? I'm curious how other people live and tips they might have! :)
Blog Face-lift
If you haven't noticed, I completely changed the look of my blog! I also changed the URL. I hope you like it! :)
Thursday, February 16, 2012
Homemade Barbara's Snackimals!
Alright. I made up my own recipe. And guess what? It WORKED. You should be pretty shocked right now. Have you ever tried Barbara's Puffins? Or Barbara's Snackimals?
 I am addicted to both. I thought to myself a few months ago, "Hey. I bet I could make these Snackimals. They're just crackers after all." And I think I did it. So here's my recipe:
You need:
1 cup whole oats, ground (I just used my mini blender)
1 cup whole wheat flour
1/2 cup white sugar
1/2 cup Safflower oil
1/4 cup molasses
1/2 teasp salt
1/2 teasp baking soda
1/2 teasp vanilla
1. Mix all the dry ingredients really well in a large bowl.
2. Add the safflower oil, vanilla and molasses. Mix well. I used my hands toward the end.
3. I refrigerated my dough for about 15 minutes, but I don't think it's necessary.
4. Roll the dough out between 2 pieces of parchment paper.
5. Cut the dough into whatever shapes you want. I didn't have any little animal cookie cutters, so I just did diamonds/squares. Also, the dough is a bit fragile and crumbly, so I don't know if adding a bit of water or oil to it before cutting the squares would be helpful?
6. Put on a baking sheet and bake at 375 for about 8-10 minutes.

When they first come out, they look like cookies, all puffy and soft. But they actually harden up really well and are crunchy when cooled! These are pretty tasty, whether they taste like Barbara's or not! :)


You need:
1 cup whole oats, ground (I just used my mini blender)
1 cup whole wheat flour
1/2 cup white sugar
1/2 cup Safflower oil
1/4 cup molasses
1/2 teasp salt
1/2 teasp baking soda
1/2 teasp vanilla
1. Mix all the dry ingredients really well in a large bowl.
2. Add the safflower oil, vanilla and molasses. Mix well. I used my hands toward the end.
3. I refrigerated my dough for about 15 minutes, but I don't think it's necessary.
4. Roll the dough out between 2 pieces of parchment paper.
5. Cut the dough into whatever shapes you want. I didn't have any little animal cookie cutters, so I just did diamonds/squares. Also, the dough is a bit fragile and crumbly, so I don't know if adding a bit of water or oil to it before cutting the squares would be helpful?
6. Put on a baking sheet and bake at 375 for about 8-10 minutes.


If you taste the dough, it tastes very molasses-ish. But this flavor bakes out.


Mmmmmm!
Monday, February 13, 2012
Fabric Bunting Banner and Fabric Hoop!
Oh boy. I am way excited about this! I've been wanting to make a banner for a long time now, and now I have! Here it is!


I also made the fabric hoop. But first, here is how I made the banner:
I cut squares 5x5.

Then I used the diagonal lines on my cutting mat to make the "flag" shape.

Here they all are!

This is sort of what they would look like...

I ironed the flags and the bias tape.

Then I used my brand new pinking shears! I love the look of this, so much more fun than plain straight cuts.

Then pinned the bias tape to the flags.


Now sew away!

I ironed it one more time and then it was done!!!

And here is the hoop! I bought an embroidery hoop at Joann's for just a few dollars. I would have bought 2 more smaller ones, but they were out. :( Okay, so never, EVER trim your material until it has been ironed and is in the hoop and is perfectly flat. I had the hardest time trying to make it flat because I had trimmed it all the way to the edge of the hoop. Just don't do that. :)

But hey, it turned out nicely!

Subscribe to:
Posts (Atom)